


How to Humanize MIDI Drums: Make Programmed Drums Sound Real
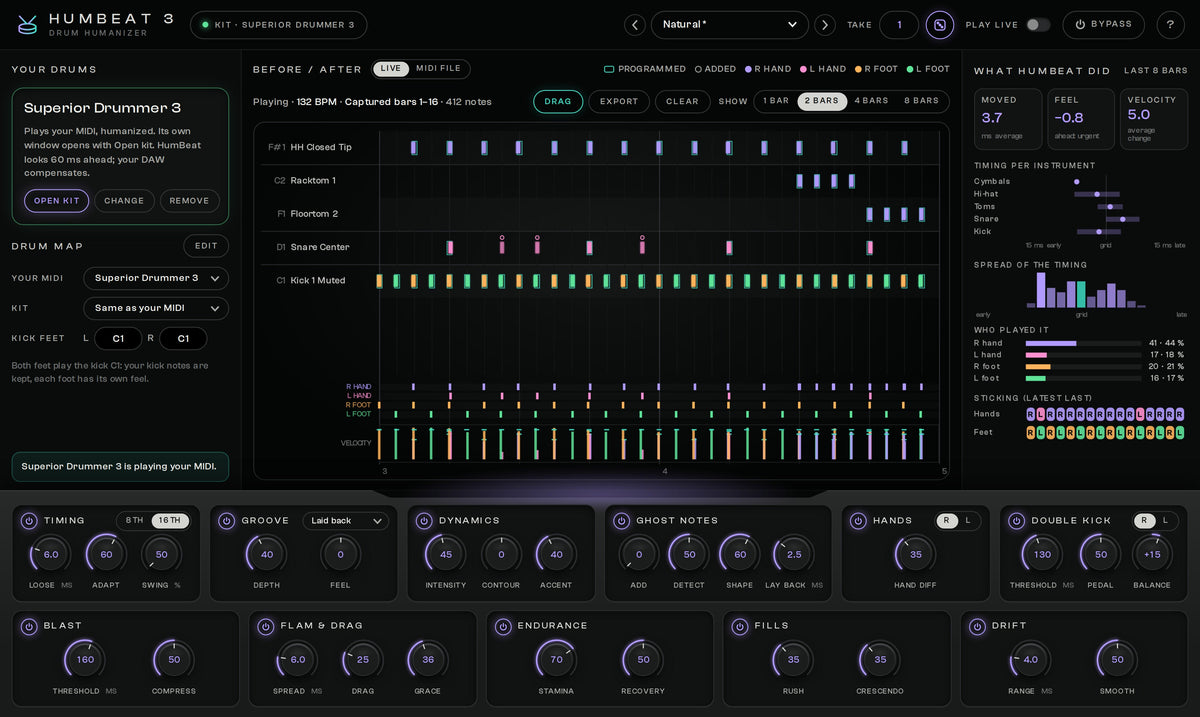
To humanize MIDI drums, change the two things a grid gets wrong: how hard every hit lands and exactly when it lands. Shape the velocities first (accents, lighter notes in between, ghost notes), then move the hits a few milliseconds off the grid. Do both the way a drummer's two hands and two feet would, not at random.
This guide shows how to make programmed drums sound real by hand, why the random "humanize" function in a DAW is not enough, and what changes for metal. Doing all of it by hand for a whole song is slow, which is why I built HumBeat 3. I will show how it does the same steps and where its limits are.
Why programmed drums sound like a machine
- Every hit is equally hard. Most drum plugins hold many recordings of each drum, from soft to hard. A row of notes at one velocity plays the same kind of hit again and again. On fast snare or kick runs that is the "machine gun" sound.
- Every hit is exactly on the grid. No drummer is. The small early and late hits are what a listener hears as feel.
- There is no body. A drummer has two hands and two feet. Programmed parts often have a hi-hat that keeps ticking through a two-handed tom fill, or a second hand that is as strong as the first.
- Nothing changes over the song. Bar 1 and bar 120 are identical. A real player pushes into a fill and gets tired in a long fast part.
How to humanize MIDI drums by hand, step by step
- Write a part a drummer could play. Count limbs: at most two things for the hands and two for the feet at any moment. If both hands are in a fill, the hi-hat stops.
- Pull the velocities down from 127. Leave room above the normal hit, or there is nowhere for an accent to go. The right numbers depend on your drum plugin, so choose by ear: a normal hit should sound played, not smashed.
- Add accents by position. On hi-hat or ride, make the notes on the beat stronger and the notes in between lighter. Kick and snare on the main beats stay strong. Then nudge single hits up and down a little so no two neighbours are equal, and keep the loudest hits the loudest.
- Program ghost notes. Ghost notes are the very quiet snare strokes between the backbeats. Keep them far below the backbeat, let them grow a little towards it, and never give two of them the same velocity.
- Make the second hand and the second foot weaker. In fast runs the hands alternate, so make every second hit a little softer. Double kick works the same way: the weak foot is a touch softer and less exact than the lead foot.
- Move the timing last, and only a little. Switch off snap and move hits by milliseconds, not by grid steps. A snare backbeat a hair late feels relaxed, hi-hats slightly early feel urgent, and the kick is the anchor. As a scale: hits within 2 to 4 ms of the grid sound like a tight session player, 6 to 8 ms like a real band, 12 ms and more like a loose demo. Fast figures are tighter than slow ones.
- Separate hits that land together. A crash and a snare, or two toms, never land at exactly the same instant. Move one of them by a few milliseconds and let the louder one come first.
- Shape fills and long runs. Let a tom fill build up in strength and push ahead a little. In a long blast or double-kick run, let the power drop slightly towards the end.
- Listen with the whole song. Timing that sounds loose in solo often sits right once the guitars and bass are in.
Velocity comes before timing for a reason: with good dynamics a part can stay almost on the grid and still sound played. With flat dynamics, no amount of timing change will save it.
Why the humanize button in your DAW is not enough
Most DAWs have a function that moves every note and every velocity by a random amount. It helps a little on hi-hats and cymbals. For the rest it is the wrong tool:
- A body does not move at random. A hand that is a little late on one hit is usually still a little late on the next. Random jumps from note to note sound nervous, not human.
- It does not know what a note is. It makes an accent weaker as often as stronger, and a ghost note louder as often as quieter.
- It treats fast and slow the same. The amount that sounds fine on quarter notes turns a blast beat or 16th-note double kick into a mess.
- It adds nothing. No ghost notes, no weaker hand, no tired feet, no fill that pushes ahead.
Use it lightly after the steps above, never in place of them.
Metal drums: tight, but not dead
Modern metal wants drums almost edited-tight, and that tempts people to leave everything on the grid at full velocity. Keep the timing tight, in the 2 to 4 ms range, and put the life into the dynamics:
- Blast beats. Real blast technique is more even and a little lighter than single snare hits. Lower fast snare runs; do not pin them at 127.
- Double kick. Alternate the feet, start with the lead foot and keep the weak foot slightly softer.
- Accents. Save the hardest hits for the moments that should hurt. If the verse is already at the top, the breakdown has nowhere to go.
The sound itself is a different job. For that side, see the guide to mixing metal drums and the common mistakes with drum samples.
When humanizing by hand stops being practical
- A full song is thousands of drum hits, and every one needs a decision.
- You change the part, and the work starts again.
- The MIDI is not yours: a groove from a pack, or a file a band member sent.
- You are writing and want to hear the drums played now, not after an evening of editing.
I built HumBeat 3 to make programmed drums feel played without that work.
How HumBeat 3 plays your MIDI like a drummer
HumBeat 3 is a drum humanizer. It turns programmed drum MIDI into a performance: the timing, the dynamics and the two hands and two feet of a real drummer. It does not scatter notes at random. Every hit is given to a hand or a foot and played the way that limb would play it. Your drum plugin plays inside HumBeat 3, so there is nothing to route.
This is the whole process on a song:
- Put it on your drum track. HumBeat 3 goes on the track as the instrument, where your drum plugin was.
- Load your drums. Click Load drums and pick your drum plugin. Any VST3 or Audio Unit drum instrument works: Superior Drummer, EZdrummer, Addictive Drums, GetGood Drums, Steven Slate Drums, BFD, Kontakt and more. Your project remembers it with all its settings.
- Check the drum map. HumBeat needs to know what every note is: a kick, a snare, a ghost note, a ride bell. Set Your MIDI to the plugin your MIDI was written for (General MIDI for most MIDI files and grooves). 11 layouts are built in, and MIDI written for one drum plugin plays on the matching notes of another.
- Press play and pick a preset. There are 12, from Natural (a real drummer on a good day) and Studio Tight to Modern Metal (tight double kick, steady blasts, punchy accents), Blast Beat and Demo Loose.
- Set the feel. Eleven modules do the steps from the list above, each with its own on/off switch. Loose sets how far a hit may land from the grid, on the scale I used earlier, and Adapt plays fast figures tighter. Dynamics varies the hits while loud hits stay loud and ghost notes stay ghost notes. Hands and Double kick give the weaker hand and foot their own feel. Blast, Flam & drag, Endurance, Fills and Drift do the rest.
- Add ghost notes if you want them. Turn up Add and HumBeat places snare ghost notes where a drummer plays them, mostly around the backbeat. It never adds one where your snare already plays, and never in fills or blasts. At 0 it adds none.
- Choose the performance. Every Take number is its own performance, and the same number gives the same one every time, in playback and in a bounce. The dice gives a new take.
- Keep it. While the song plays, HumBeat records what it plays. Drag that MIDI to bar 1 of your project in place of the original, switch HumBeat to Bypass, and you can edit single notes by hand.

You can also drop a single drum MIDI file onto HumBeat 3, hear it with your drums and drag or export the humanized file. The same works without a DAW, in the HumBeat 3 app.
It runs on Windows 10 and 11 (64-bit) as a VST3 plugin and as an app, and on macOS 11 or newer, on Intel and Apple Silicon, as Audio Unit, VST3 and an app. There is no AAX version for Pro Tools.
The fastest way to judge it is on your own drum track. The free 7-day trial is the complete plugin and needs no payment: install it, sign in to the free Plugins & Apps Manager app with your store account and start the trial.
If you would rather watch first, the product page has a 10-minute tour of every feature, recorded from the real plugin.
Honest limits of HumBeat 3
- It needs your drum plugin. HumBeat 3 has no drum sounds of its own. It plays the drum plugin you already have, or sends the humanized MIDI to it on another track.
- It plays your part; it does not write it. The only notes it adds are snare ghost notes and grace notes before a snare hit, and only when Add or Drag is turned up (some presets do that). A beat that is boring, or that no drummer could play, stays that way.
- It works on MIDI. Recorded audio drums are a different job.
- The drum map has to be right. If Your MIDI is not set to the plugin your MIDI was written for, some notes do not play or sound different. A sound your kit has nothing like, a cowbell on a kit without one, stays in the MIDI and is silent.
- Played live, it can only be late. For playback HumBeat looks 60 ms ahead, so the drummer can also play ahead of the beat, and your DAW makes up for it. When you play pads or e-drums in real time you switch on Play live: there is no delay then, and notes can only come late, never early.
- It does not mix your drums. A humanized part through a flat kit is still a flat kit. My drum presets and templates are for that side.
MIDI drum humanizing FAQ
How do I make MIDI drums sound realistic?
Write a part two hands and two feet could play, then shape the velocities: accents on the beat, lighter notes in between, quiet ghost notes and a weaker second hand. Move the timing last, by a few milliseconds.
What velocity should programmed drums be?
There is no single number, because every drum plugin answers to velocity differently. Avoid 127 on every hit. Find the velocity where a normal hit sounds played, keep accents above it and ghost notes far below it.
Should I quantize drums before humanizing them?
If the part was clicked in with the mouse or played sloppily, yes: start from a clean part and add the feel on purpose. If it was played well on an e-kit, it is already human. Leave it, or only tighten the worst hits.
How much timing variation sounds natural?
Less than most people expect. Hits within 2 to 4 ms of the grid sound like a tight session player, 6 to 8 ms like a real band, and 12 ms or more like a loose demo. Fast parts need less than slow ones.
Which drum plugins does HumBeat 3 work with?
Any VST3 or Audio Unit drum instrument: Superior Drummer, EZdrummer, Addictive Drums, GetGood Drums, Steven Slate Drums, BFD, Kontakt and more. Drum maps for the popular ones are built in, and MIDI written for one plugin plays on the matching notes of another.
Which formats and systems does HumBeat 3 support?
VST3 and the app on Windows 10 and 11 (64-bit); VST3, Audio Unit and the app on macOS 11 or newer, on Intel or Apple Silicon. It works in any DAW that loads VST3 or Audio Unit instruments. Pro Tools (AAX) is not supported.
Try it on your own drum track
If you have the time, humanize by hand: velocities first, ghost notes, a weaker second hand and foot, and timing last. When the song has thousands of hits, or the part keeps changing, let HumBeat 3 play it.
Start the free 7-day trial of HumBeat 3
The HumBeat 3 product page shows every module and the full video tour. If you would rather start from finished grooves than from an empty grid, there are my drum MIDI packs. The same kind of guide for guitars is how to double track guitars.
Recommended for you
Shop Related Products
Explore our drum presets & templates used by thousands of producers


Continue reading
How to Double Track Guitars: Tight, Wide Rhythm Tones at Home
Double tracking makes rhythm guitars wide because two separate performances are never identical. Here is how to record a real double, how tight it has to be, the mistakes that make doubled guitars sound...
Leave a comment
All comments are moderated before being published.
This site is protected by hCaptcha and the hCaptcha Privacy Policy and Terms of Service apply.